Christmas Window 2025
- Sarah Tompkins
- Dec 3, 2025
- 7 min read

Updated: Dec 24, 2025
Thanks for dropping by my blog to check out BlueCat Quilting's 2025 Christmas Window for Newbury Living Advent. This is my second year supporting my local community and my good friend Magdalen, who organises this fun event in Newbury. Newbury Living Advent is now in its eighth year, showcasing amazing window displays and activities from local businesses, schools, churches, charities, community hubs and individuals. Once again, we're raising funds for three fantastic local charities – Eight Bells for Mental Health, Newbury Soup Kitchen, and Loose Ends.
After being invited to join again, I had to pick a theme. It was tough with so many ideas, but I knew it had to be made from “scrap” fabrics. What is scrap fabric quilting?
If you search for scrappy quilting online or in books, you’ll find yourself going down quite a long rabbit hole! You’ll also see that scraps mean different things to different people. At BlueCat Quilting Studio, I don’t have a huge amount of fabric, so pretty much all my stash could be classed as scraps. I have mismatched fat quarters, recycled fabrics, and a few bits of “yardage.” Since quilting cotton can be pricey, I try to use every little piece! After being challenged to make something with Christmas fabric, I realised I had none in my stash, so I bought a mystery bag of 20 fat quarters and received some Snoopy fat quarters for Christmas – hey presto I had a Christmas stash! For last year’s Advent Window, I made bunting from these fat quarters, which created scraps and crumbs (tiny fabric bits). I also picked up a Christmas duvet set from a local charity shop and some other festive bits from Market Square Quilters. These new bits, last years scraps and crumbs are what I decided to use this year.
But what to theme the window…
I saw a YouTube video from Merry Mabel Market where teddies were wrapped in quilts as gifts. I thought it’d be sweet to have teddies all cozy in bed, ready for Christmas. The first line of Clement-Clarke Moore’s poem “A Visit from St. Nicholas” popped into my head, and the window idea just clicked. Since each teddy needed a bed, all I had to do was make 7 or 8 Christmas-themed lap quilts!
‘Twas the night before Christmas
One quilt would have to be the main focal point of the window, and I wanted to use the first line of the poem. Using a pattern I have used before; Moda pattern called “Love”, (one quilt 3 ways). I saw the main motif of the pattern looked like a wreath, using pale green and white charm squares (5” squares) to form a subtle background. I enlarged the quilt with red candy cane stripes. At this point the quilt topper was quilted on my Amara longarm using an edge-to-edge pantograph called Snowflake Flurry. Whilst the quilt was still on the longarm, I created large letters (font Grilled Cheese), transferred the file to my Cricut and cut out the letters using the same red fabric. The letters were then stitched directly onto the quilt (raw edged applique). Once removed from the longarm I was able to trim the quilt and add a small red binding that was hand finished on the back. I am super pleased with the look of this quilt, it would look great as a festive wall hanging, but I prefer to snuggle up under a quilt on a cold winter evening.

Starry Night
Now that I had my centrepiece quilt, I needed two quilts on either side to represent the night sky. I found this design online and figured out the pattern myself. Using traditional quilt piecing with HSTs (half square triangles), this quilt used a lot of 2½” squares and strips, which is a common measurement in quilting. I sorted rainbow-coloured squares and strips from my scraps, then cut out squares and strips from my box of black fabric scraps. Putting this one together kept me busy and took the longest tome to piece. To make the stars stand out, I picked another edge-to-edge pantograph called Star Sparkle by Urban Elementz. The soft swirls and stars go perfectly together. Since it’s not overly festive, this quilt would be great to use all year round.

Snowy Village
Taking inspiration from the internet again, I thought a winter village scene would be perfect for my other night sky quilt. Making it was really enjoyable, using all sorts of scraps. First, I had to create the background for the main scene with sky and snow. I had loads of thin strips leftover from trimming quilt blocks. I randomly sewed these strips together into longer ones, then stitched those longer strips together to make a fabric piece big enough for the quilt’s centre. I wanted a star border around the village, so I used 2 ½” squares to make a 9-patch star block. The star points were improvised for a quirky, wonky look. After adding the star blocks as a border, I included a thin strip of metallic blue Christmas fabric as a little cheat to make the binding look bigger once attached. Then I mounted the quilt on the longarm machine. I used the Star Sparkle pantograph again for the sky but stitched wavy lines for the snow. Before taking it off the longarm, I made the village decorations. I created a 12” square of fabric for the fir trees by bonding thin green cotton strips (too thin to quilt together) onto a cotton base. I stitched down the raw edges with embroidery and zigzag stitches using silver metallic thread. After stitching, I ironed on more bond-a-web and hand-cut the shapes into Christmas trees. Simple rectangles of brown fabric became the trunks. For the houses, I sketched a design. After ironing bond-a-web onto bright solid fabrics, I cut out the shapes needed for the houses. Before placing them on the quilt, I added door and window details with free-motion stitching on my domestic sewing machine. I arranged the trees and houses on the quilt until I liked the design, then, starting with the background details, I ironed and stitched each tree and house in place. Once everything was stitched down, I removed the quilt and trimmed it, ready for the binding. This time, I machine-bound the quilt with a decorative stitch. The snowflakes were hand-stitched with pearl cotton, and the little blue cat was added using needle-turn applique.

Now it was the time to make the quilts for the teddies beds.
Christmas Leftovers
This quilt (I will confess) was made in January this year, it used crumbs created from making my Advent Window Quilt from last year. I have a couple of videos on Instagram showing the process of making this quilt, Making Tree Blocks and Piecing the Quilt. The tree design from this quilt then inspired me to make the next two quilts for the window.

Improv Trees
Even though these two quilts were inspired by the Christmas Leftovers quilt, they were put together in very different ways. The method involved stacking several blocks on top of each other and then cutting through all the layers at once. For the red and green quilt, I cut about 14 pieces of each colour, roughly 7” x 9”, and stacked them alternately into one pile. Then, this pile was divided into four smaller piles, each with an even number of pieces. Each pile was cut with a ruler and rotary cutter in a specific order, but the exact placement of each cut wasn’t measured, so the trees from each pile ended up slightly different.
The pieces were then sewn back together in the reverse order they were cut. The same technique was applied to the white and blue tree quilt, but this time 25 pieces of each colour were cut. The 25 blocks from each quilt were then sewn together using a net technique. I added a border to the red and green quilt. For quilting, I chose two different pantographs: a hand-drawn design of a reindeer and tree for the red and green quilt, and Snowflake Flurry for the white and blue one. Both quilts were finished with a simple binding that was hand-stitched on the back.


Christmas Potato Chips
Potato Chip quilt blocks are simple shapes that are twice as long as they are wide. The quirky name comes from the fact that making quilts with these blocks is just as addictive as eating potato chips (crisps!) So, I went ahead and cut lots of 4x2 (4 ½”x2 ½”) potato chip blocks from my leftover scraps.
That said, I found these little blocks a bit frustrating. I tried several designs but ended up unpicking most of them. The first quilt I finished was pretty basic, featuring two columns of potato chips (like Pringles?) with red and white sashing. Simple, but effective.
The second potato chip quilt is inspired by a broken courthouse step pattern, but I used the same colour for each round. To make the quilt rectangular, I pieced some together on their ends during the second white round. I finished the topper with rounds of white and green sashing.
Both quilts were quilted using the Star Sparkle pantographs and finished with machine binding.


I’ll admit, these blocks have really grown on me. Since I didn’t use as many pieces as I expected, I’m now working on a Christmas table runner made from the leftover potato chip blocks.
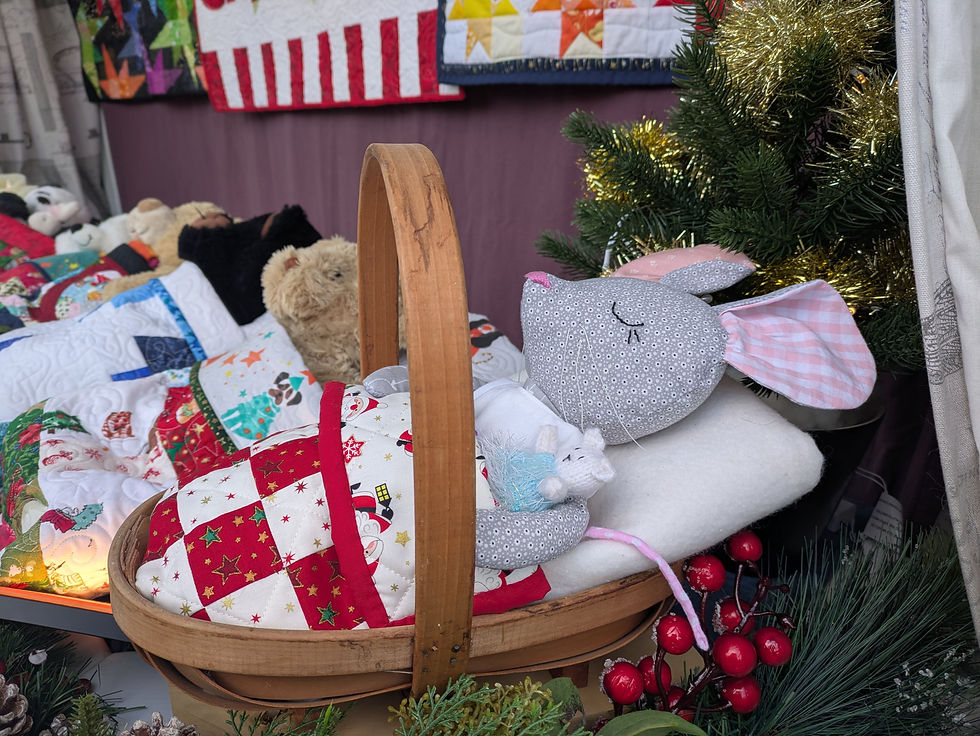
After finishing the quilts, I needed 5 furry friends to tuck into bed. I rehomed a couple of teddies from the local charity shop and dug through our old toy box. But I was missing one creature—a mouse. I really wanted a patchwork mouse. Very early one morning, while the idea was bouncing around in my head, I searched online and bought a PDF Mouse Doll pattern from TinyTalesPatterns on Etsy. Within about an hour, little Pip Mouse was made. She’ll be fast asleep, all cozy in her bed, dreaming of dancing sugar-plums!
Merry Christmas
Sarah


Comments